


Welcome to the second in a three-part series of my journey setting up a brand-new garden space. After a brief pause while awaiting supplies, construction of the new garden finally got underway in mid-April!
Location: My trusted automatic sprinkler vendor came by and marked out the existing heads. He’s accommodating of my ambitions and told me to build the garden wherever I want it, and then he’ll come reroute lines and sprinkler heads as-needed. I used tried and true plumb lines of landscaping flags, a tape measure, and string to mark the garden edges, and a rototiller to turn up the existing grass and a few inches of dirt. The area had been lawn for well over a decade, so loosening the soil was critical.
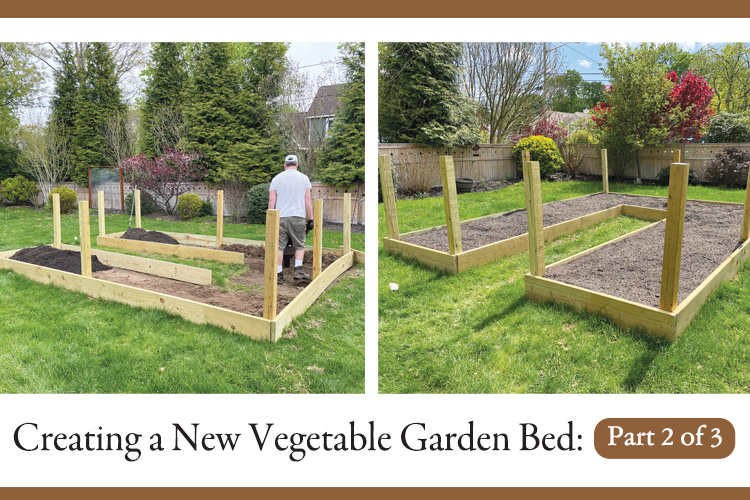
Building materials: For the garden bed itself, I selected 2” thick pressure treated lumber specifically formulated for ground contact. Depending on the seller, I also saw it called “severe weather” wood. Knowing that wood, dirt, and water can make for a rotten situation, I wanted to choose durable materials that will last. It’s definitely more expensive than regular wood, but at a big box store, it was way less than I would have paid for a pre-fabricated raised bed kit, and I was able to get the exact dimensions I wanted. As mentioned in Part 1, I wanted the bed to be slightly raised, so I chose 10” wide planks. The 4” x 4” vertical connecting posts are also treated for ground contact, and were cut to 4’ high. Note that big box home stores and most lumber yards will cut-to-size for you if you don’t have the tools at home.
Size and shape: Sticking with my planned “U” shape, the final overall dimensions are: 16’ x 12’.
Grow-goals: A garden will not thrive without proper dirt. I sourced the topsoil fill from a local nursery; if you do this, be sure to specify “screened” topsoil. Unscreened topsoil is less expensive, but you’ll end up paying for all sorts of non-garden friendly things mixed in. Quality topsoil is dark in color, rich looking, and smells great. Pro-tip: If math isn’t your favorite subject, your nursery will be happy to calculate how much topsoil is needed. You just need to provide the dimensions of the garden.
The nursery brought the dirt to my house in a dump truck and put it on a tarp I’d set up by the curb, on my lawn. Being a good neighbor and town code means keeping it off the street. The tarp is key to ensure you don’t lose too much of the dirt in the grass, and it can be helpful for condensing the pile. Then, it was gracious family labor, a borrowed wheelbarrow, and many trips to the backyard to relocate the dirt to its new location! I mixed in the rototilled grass with the new topsoil as additional compost. I was reassured about the quality of the dirt when I saw robins searching in it for worms. Pro-tip: have your dirt delivered when you’ll be able to move it immediately. Otherwise, the grass underneath will die in a day or two, especially if temperatures are warm. I don’t recommend having the dirt dumped in your driveway if it’s made of concrete, brick, or any other porous material, as the dirt may stain. The garden is now looking great and ready to go.
Next up: Planting, securing the critter fencing, and enjoying the results of hard work!


 20 lucky winners will win $500 each in prizes totaling $10,000.